2. Treasure Hunt

In this activity, you will program a game where the player uses the arrow keys to control a character, moving around and "collecting" treasures by bumping into them to increase the score.
Learning Objectives
- Create a treasure hunt game in StarLogo Nova
- Learn to start a project from scratch
- Explore new commands without fear of breaking something
- Learn essential concepts that apply to every StarLogo Nova game
New Terms
Breeds • Socket • Procedure
Model Overview
- Agent Types ("Breeds")
- Player
- Treasure
- Obstacle
- Behaviors
- Keyboard controls agent's movement
- Interactions
- When a Player collides with either a Treasure or an Obstacle, it deletes the agent
- Data
- A data box "keeps score" -- increasing when treasure is collected and decreasing when an obstacle is collected
Part 1: Create and Rename Breeds
In this section, we will rename an existing breed and create two new breeds (treasure and obstacles).
1. Rename an Existing Breed
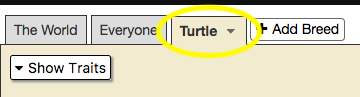
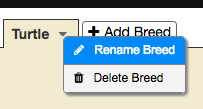
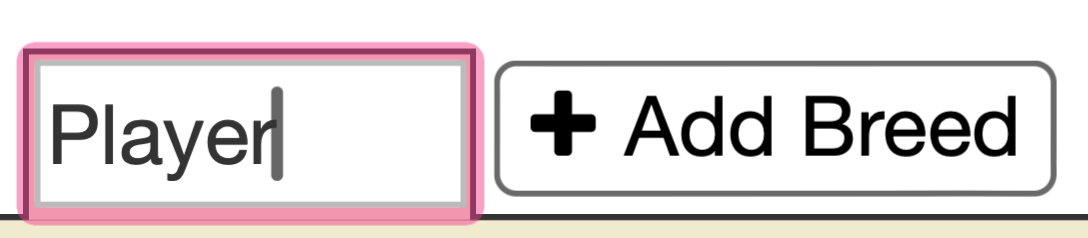
- Click the "Turtle" tab at the top of the code area, and then click the triangle to the left.
- Click the "Rename breed" button.
- Type "Player" in the textbox and then click away to complete the rename.
2. Create a New Breed
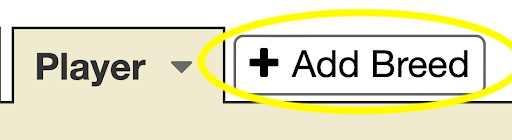


- Click the "Add Breed" button to add a new breed (type of agent).
- Name your new breed "Treasure".
- Repeat this step to make a new breed named "Obstacle".
A breed is a type or category of agents. All agents of a specific breed share the same traits and follow the same instructions.
Check Your Progress!
Make sure you have the six tabs shown below in your Workspace:

Part 2: Setup - Creating the Treasure
In this section, you will create Treasure and give them initial traits when the "setup" button is clicked.
1. Respond to Button Clicks
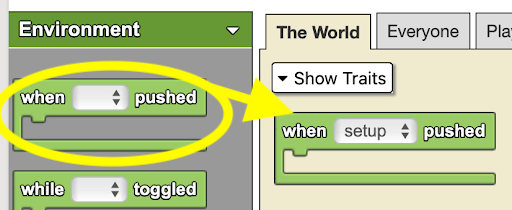
- Click "The World" tab to display "The World" page.
- Open the Interface drawer.
- Drag a "when ___ pushed" block from the drawer onto the page.
- Select "setup" from the drop-down menu.
- The "setup" option refers to the "setup" button which is located in SpaceLand.
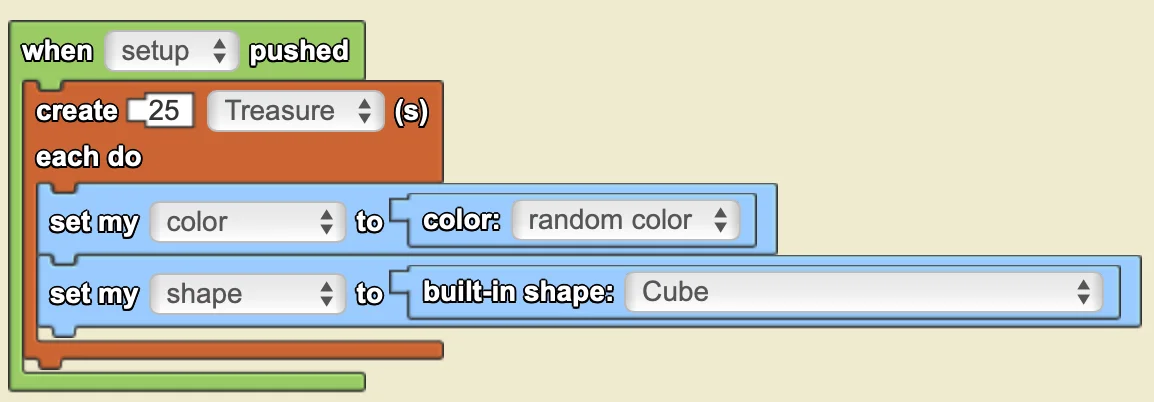
2. Create 25 Treasure Agents
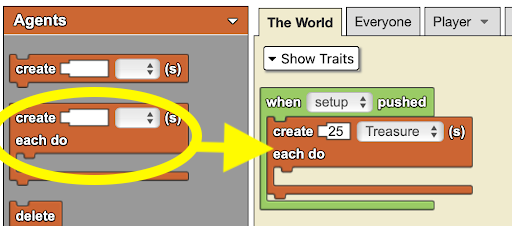
- Open the Agents drawer.
- To create 25 Treasure agents in SpaceLand:
- Drag the "create___each do" block below the "when [setup] pushed" block and connect it.
- Type the number "25" into the empty socket on the "create___each do" block.
- Select "Treasure" from the drop-down menu in the block.
Each of the newly created agents immediately follows the directions you specify in the "do" section of the "create___do" block.
3. Change the Traits of Treasure Agent
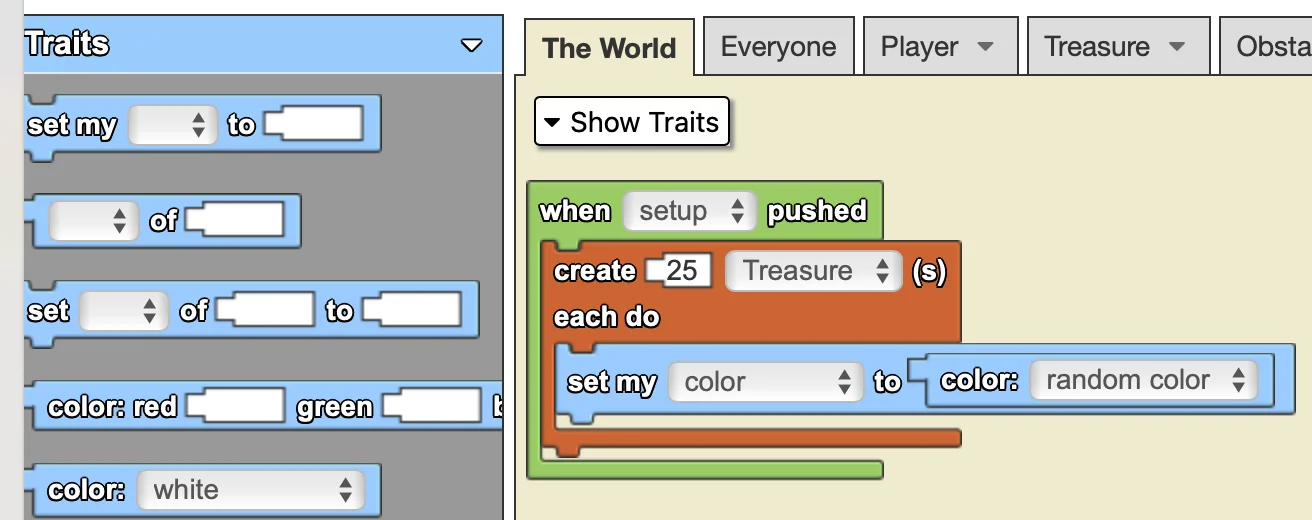
- Open the Traits drawer.
- To set the color of the treasure:
- Drag the "set my ___ to ___" block and connect it inside the "create___each do" block
- Select "color" from the drop-down on the block.
- Drag the "color:___" block and place it into the empty socket on the "set my___ to ___" block.
- Choose the color "random" from the drop-down menu of the "color ___" block.
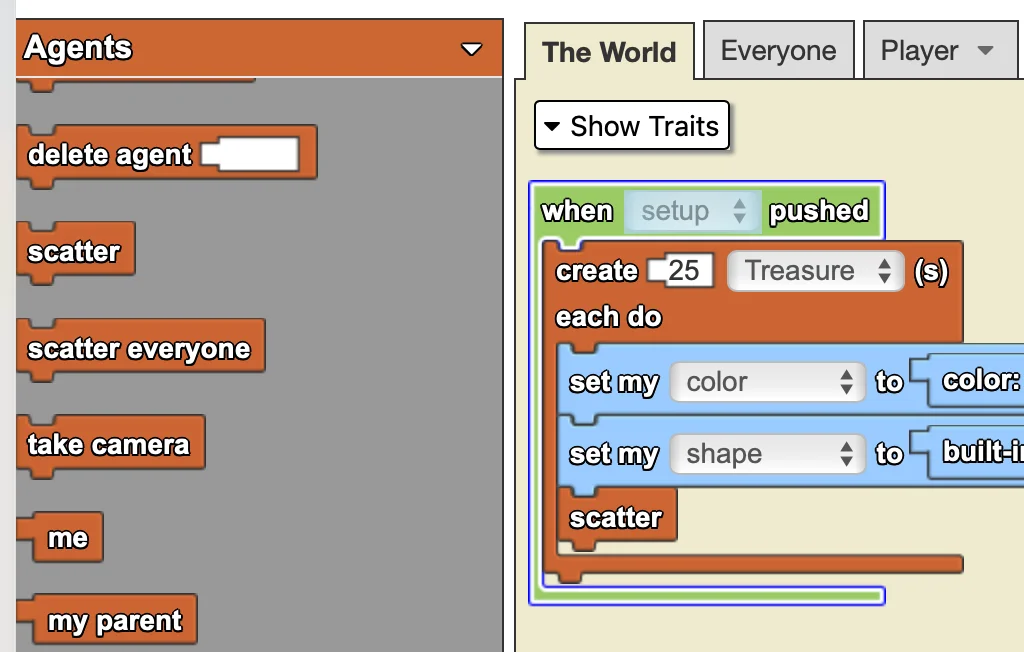
- Use a similar process to change the agent's shape. Use the "built-in shape" block to select a shape for the agent.
The "set my ___ to ___" block is used to set or change the traits of the agents. The trait is chosen from the drop down menu and includes color, shape, size, etc. The "color:___" block represents a specific color chosen from the drop down menu. When specifying colors you should use one of the "color" blocks. Agents may not understand typed-in words like red, purple, yellow, etc.
4. Scatter the Agents
- Open the Agents drawer.
- To randomize the position of the treasure in SpaceLand:
- Drag the "scatter" block and place it below the "set my___ to___" blocks, still inside the "create___each do" block.
The "Scatter" block allows each of the 25 Treasure to set its location to a random position in SpaceLand.
Check Your Progress!
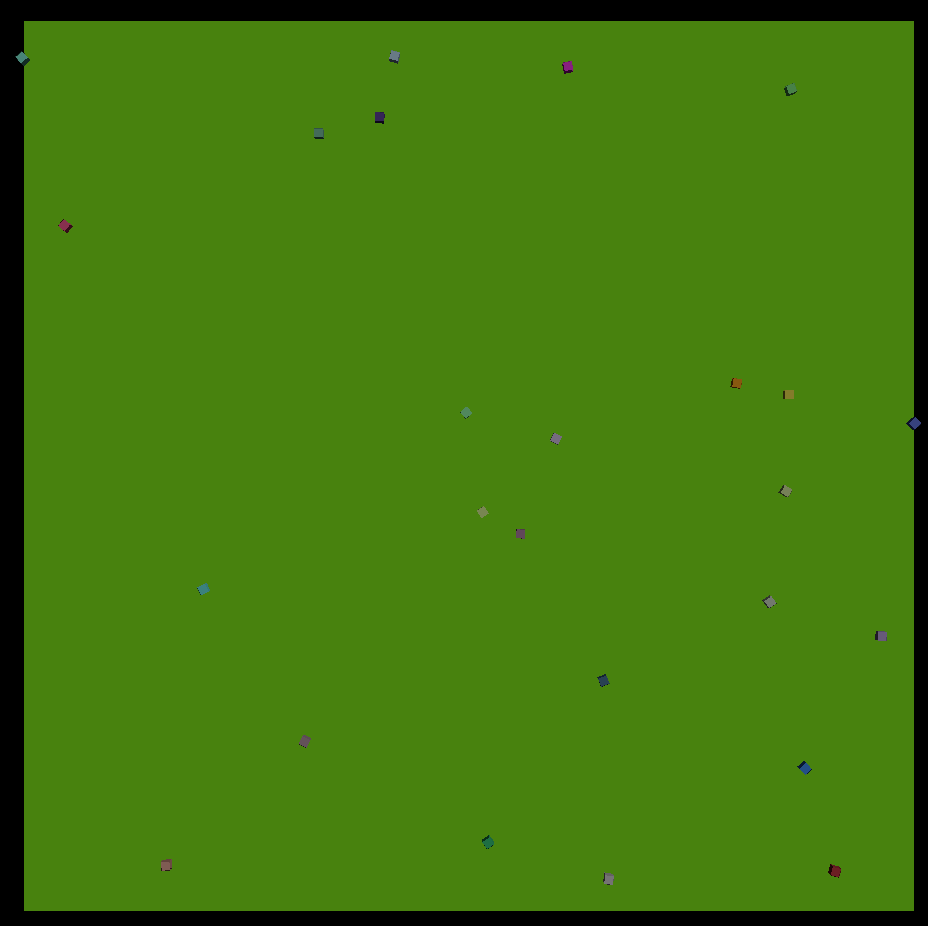
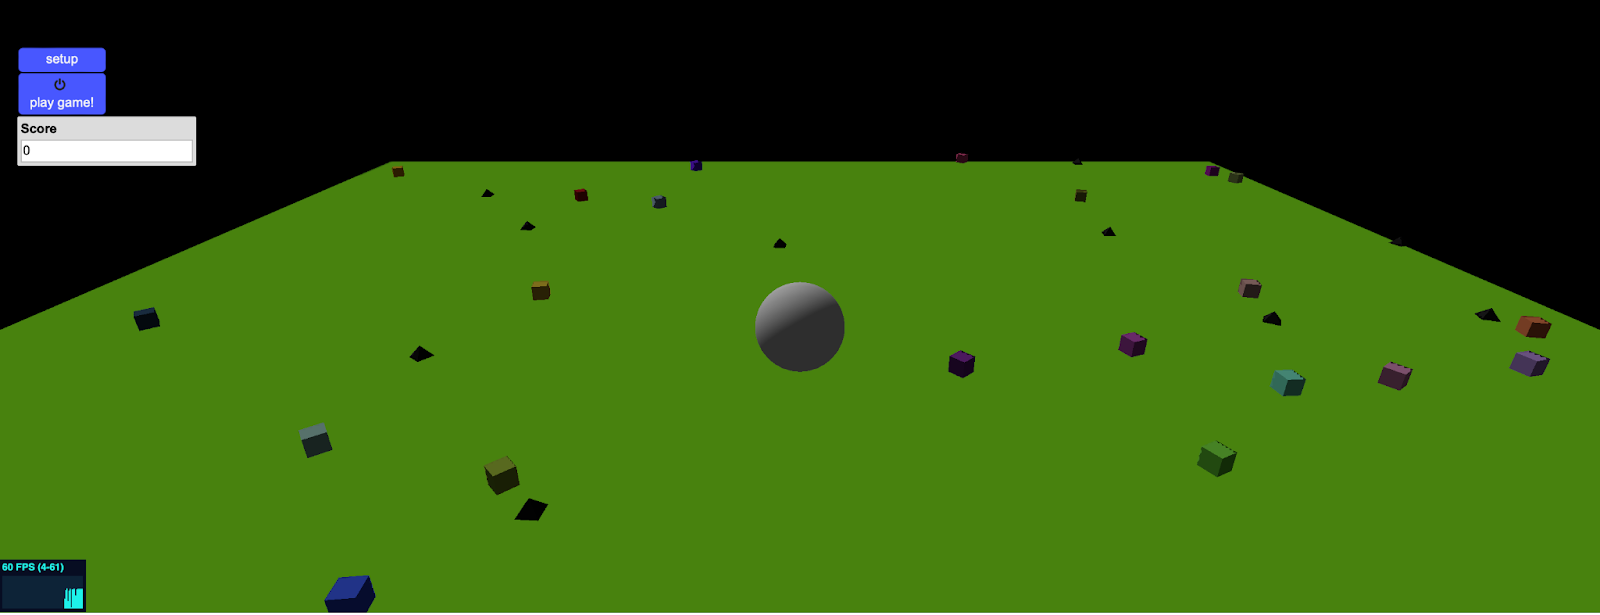
Click "Run Code", then every time you click "setup" you should see 25 more Treasure agents with random colors and the shape you selected.
Part 3: Setup - Creating the Obstacle Agents
In this section, you will create Obstacles and edit their traits.
Practice What You've Learned!
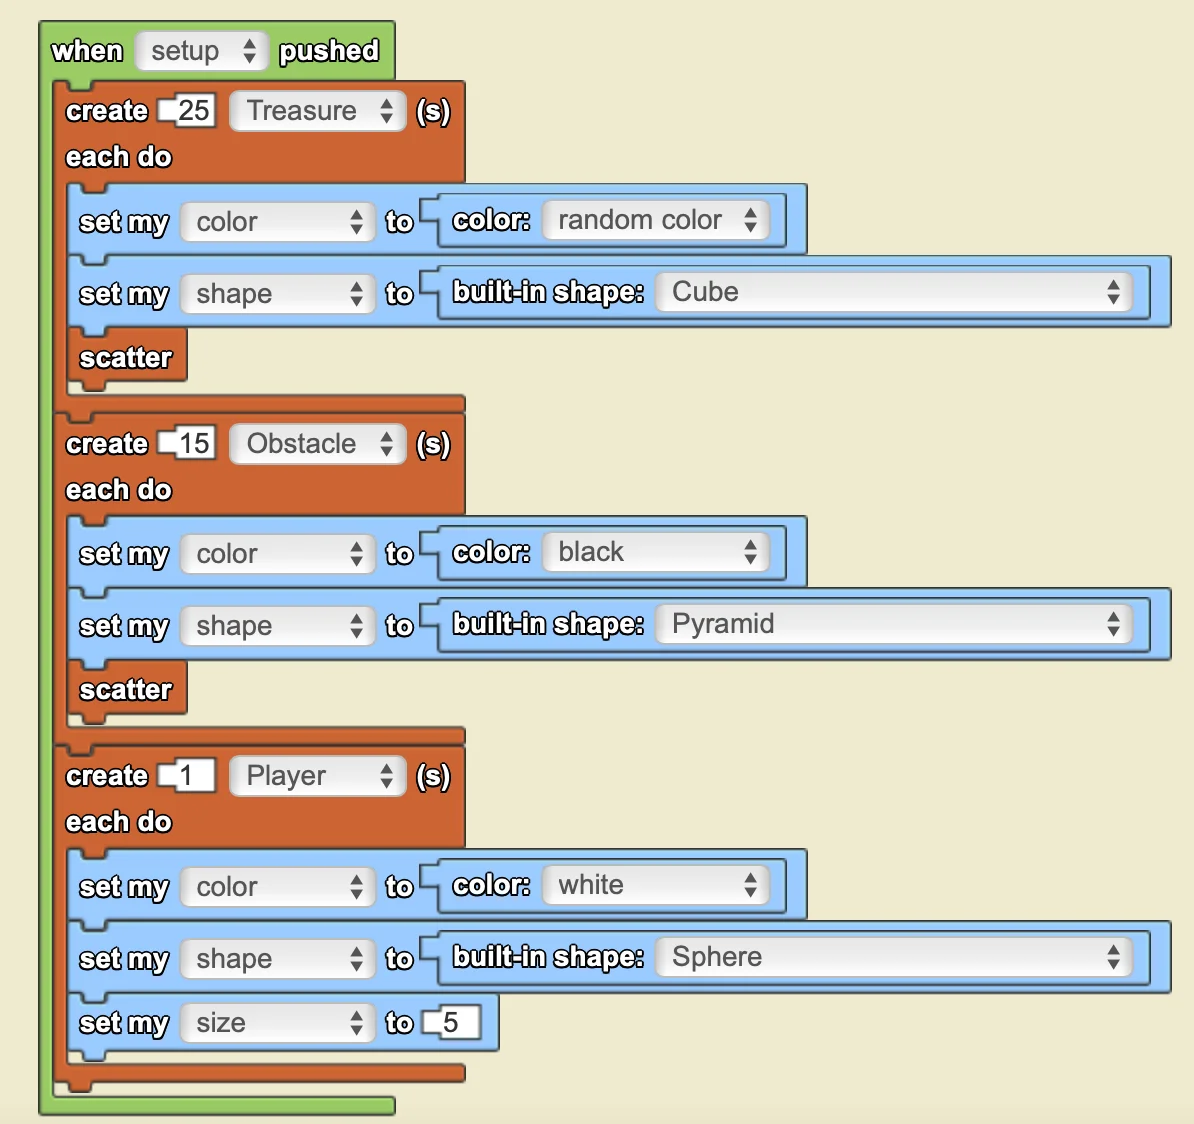
Use the skills and knowledge you learned in Part 2 to create new Obstacle agents in SpaceLand: In the same "When [setup] pushed" block where you created the Treasure, create 15 Obstacle agents whose color is black and shape is a pyramid, and scatter them.
Show Solution
Check Your Progress!
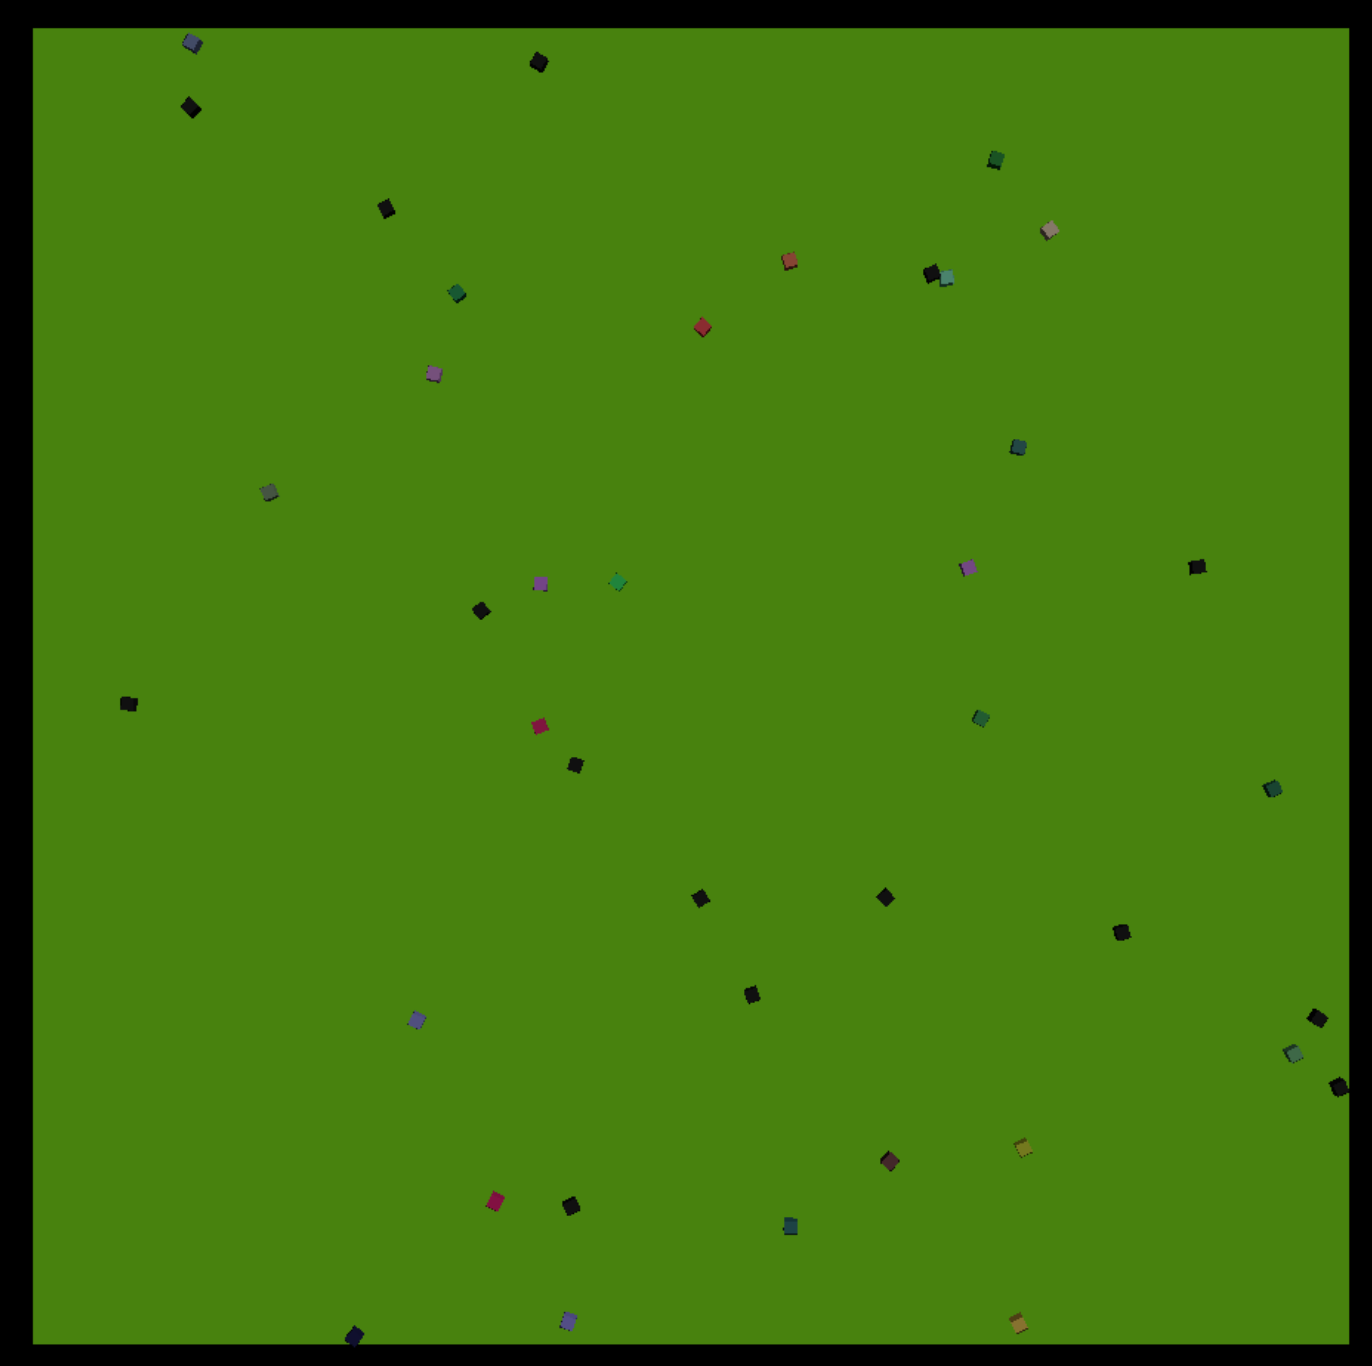
Click "Run Code", and then every time you click "setup" you should see 25 more Treasure agents and 15 more Obstacle agents.
Part 4: Setup - Creating the Player Agent
In this section, you will create the Player and edit its traits.
Practice What You've Learned!
Use the skills and knowledge you learned in Part 2 to create a new Player agent in SpaceLand: In the same "When [setup] pushed" block where you created the Treasure and Obstacles, create 1 Player agent whose color is white, shape is a sphere and size is 5 (hint: type the size number into the empty socket of the "set my_ to _" block).
Show Solution
Check Your Progress!
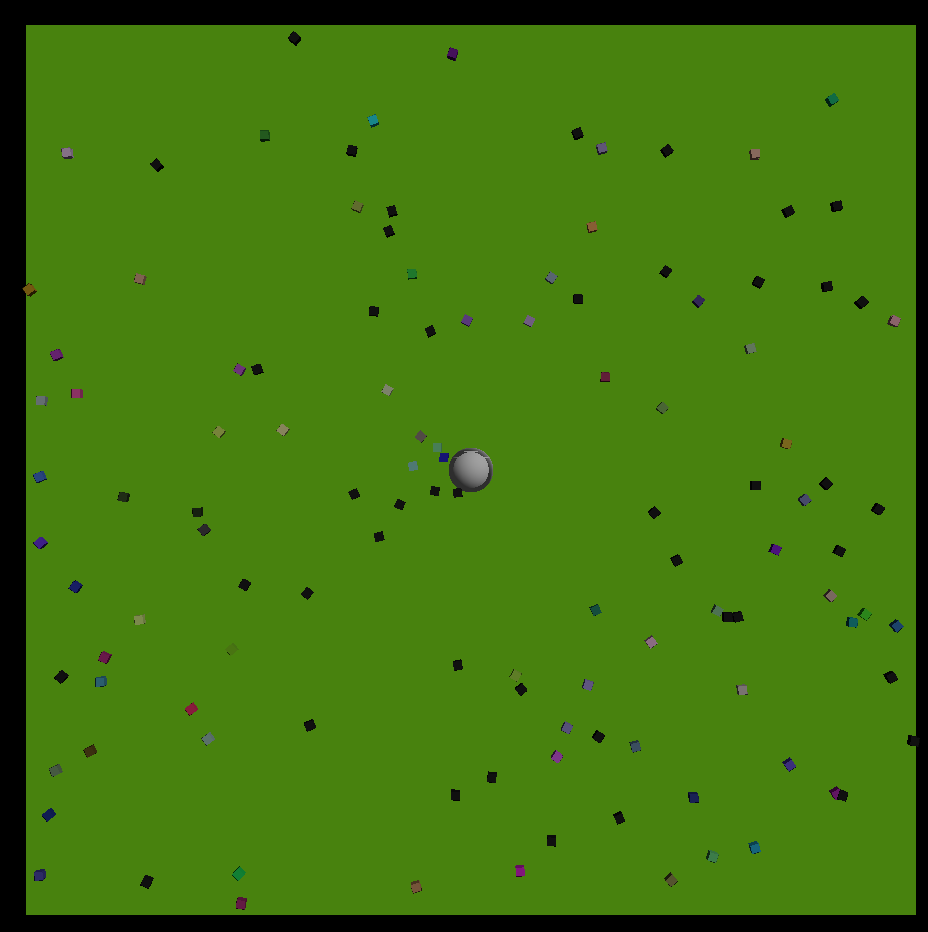
Click "Run Code", and then every time you click "setup" you should see 25 Treasure agents, 15 Obstacle agents, and one Player.
Part 5: Setup - Editing Button Widgets
In this section, you will rename existing widget buttons.
1. Rename a Button Widget
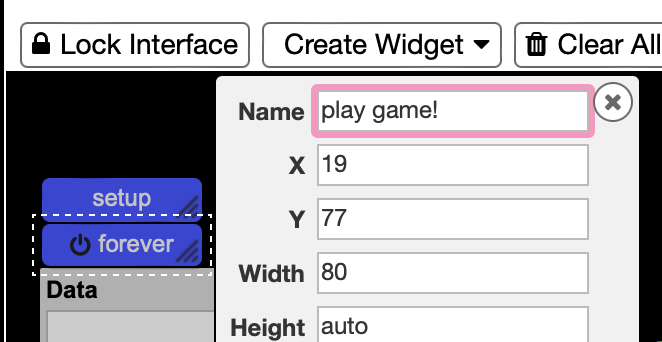
- Click on the "Edit Interface" button on the bar above SpaceLand.
- Click on the "forever" button and type "play game!" in the box labeled "Name"
- Click the "(X)"
2. Rename a Data Box
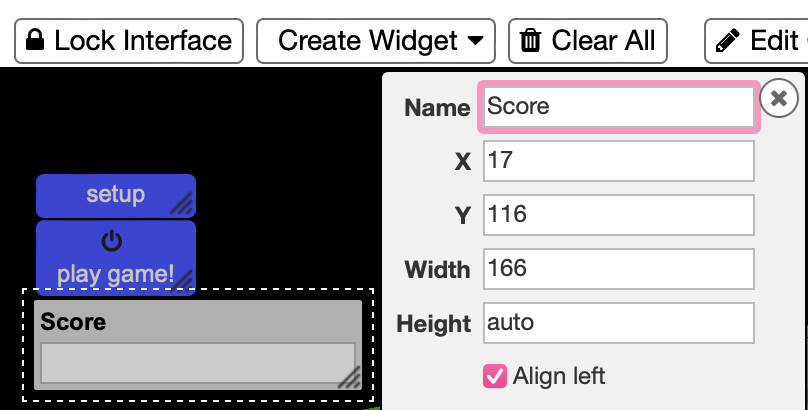

- Make sure you are still in "Edit Interface" mode
- Click on the "data" data box and type "Score" in the box labeled "Name"
- Click the "Lock Interface" button to exit "edit interface" mode
Check Your Progress!
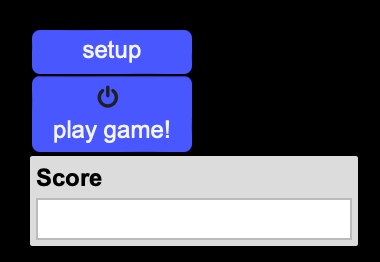
You should see three widgets in SpaceLand -- "setup", "play game!", and "Score"
Part 6: Setup - Reset the Model
You might have noticed that every time you click "setup", more and more agents are added to the game. Instead, we want the number of agents to start fresh every time we click "setup". In this section you will add code so that each time you click the "setup" button, SpaceLand will reset.
1. Delete Old Agents
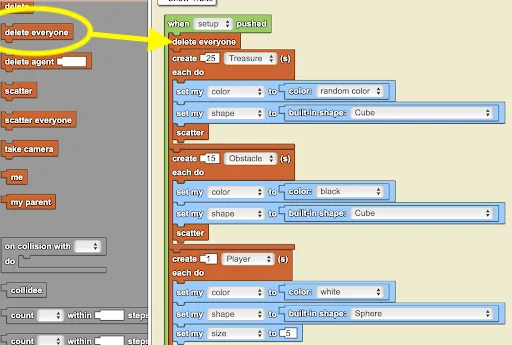
- Make sure you're still on "The World" tab
- Open the Agents drawer
- To make sure all old agents are deleted when "setup" is pushed:
- Drag the "delete everyone" block inside the "when ___ pushed block" but before the "create ___ do" block
2. Reset Data Box
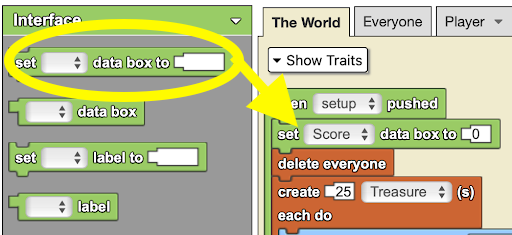
- Open the Interface drawer
- To have the data box reset to 0 when "setup" is pushed:
- Drag the "set _ data box to _" into the "when setup pushed block"
- Select "Score" from the dropdown menu
- Type 0 into the empty socket
Check Your Progress!
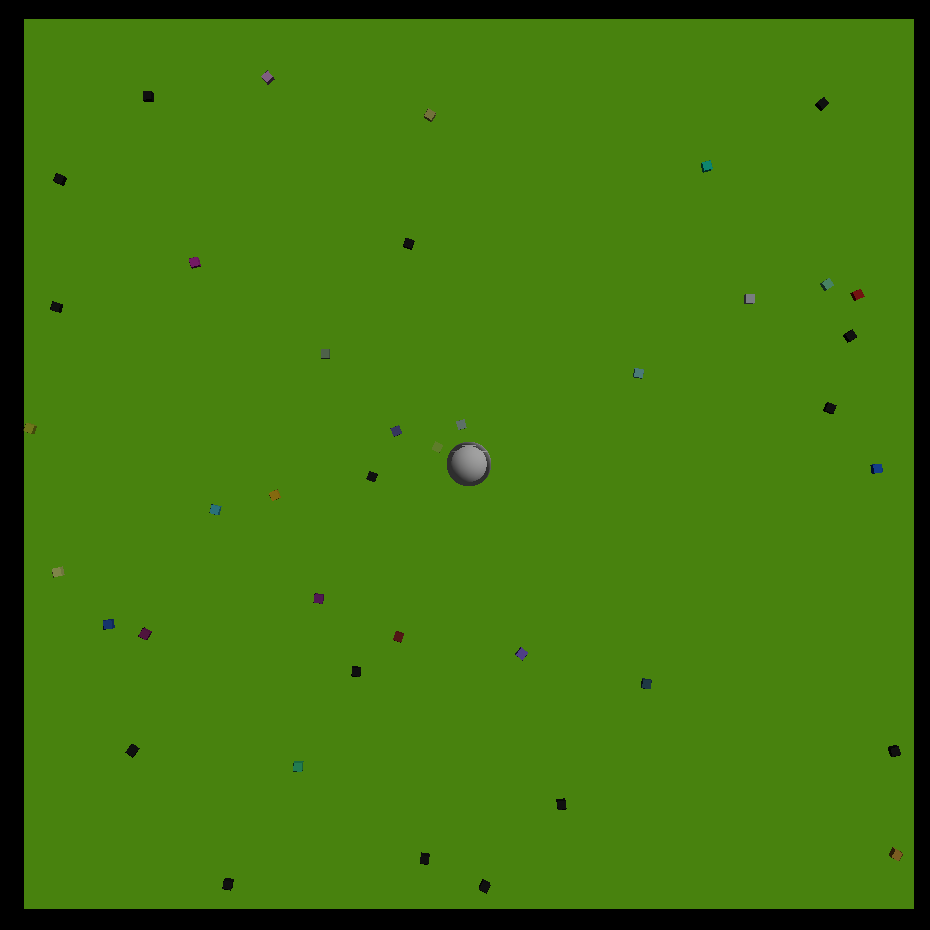
Click "Run Code", then every time you click "setup" you should see only 25 Treasure, 15 Obstacle and 1 Player, because the previous ones were cleared before new ones were added.
Part 7: Change Camera View
In this section, you will change the camera view to follow the Player agent.
Have Agent Take Camera
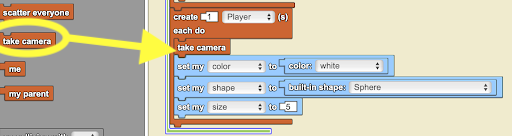
- Open the Agents drawer.
- To change the camera view to the POV of the Player agent:
- Drag the "take camera" block inside the "create___each do" block with the Player agent selected.
Check Your Progress!
Click "Run Code" and "setup". The camera view should be from the perspective of the Player agent.
Part 8: Keyboard Controls
You've made your agents, but your game doesn't do anything... yet. In this section, you will program a procedure that connects the keyboard to the agent's movement.
1. Create a Procedure
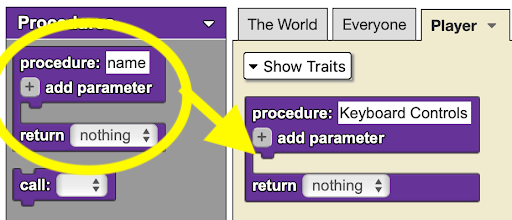
- Navigate to the Player page -- any code here is only followed by the Player.
- Open the Procedures drawer
- Drag the "procedure: _" block onto the Player page
- Rename the procedure to "Keyboard Controls"
A procedure tells an agent how to do something. It takes a set of code and gives it a name, which makes your program easier to think about. Procedures let us "chunk" our knowledge by ignoring some of the details and focusing on the important ideas.
2. Program the Procedure
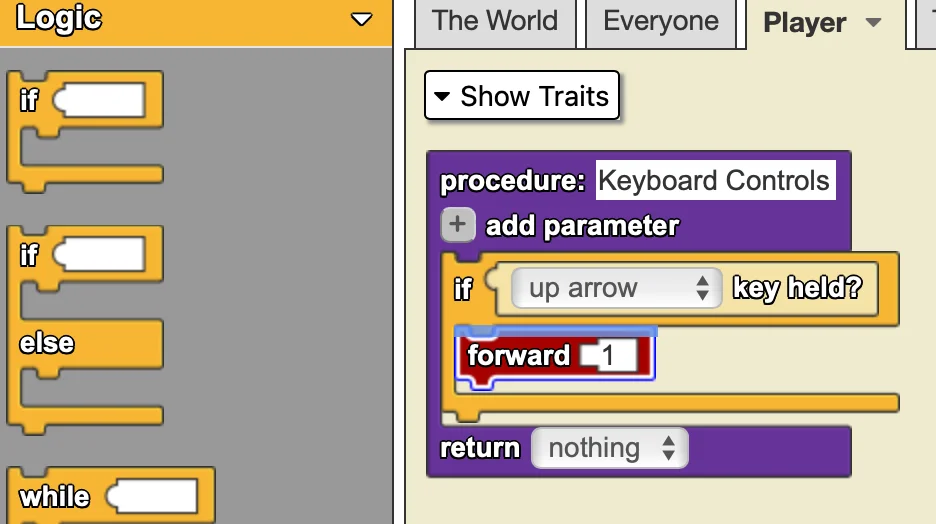
- Open the Logic drawer
- Drag out the "if _" block and place it inside the "procedure:" block
- Open the Keyboard drawer
- Drag out the "_ key held?" and place it into the empty socket of the "if _" block
- Select the "up arrow" from the dropdown menu
- Open the Movement drawer
- Drag the "forward" block inside and connect it to the "if_" block
- Type "1" into the empty socket -- this means that while the up arrow is held the agent will move forward 1
The "1" tells the player agent to take 1 step during each tick (The StarLogo clock ticks 5 times per second when it is running at default speed). A higher number of steps will make it appear as though the Player is moving faster.
3. Practice What You've Learned!
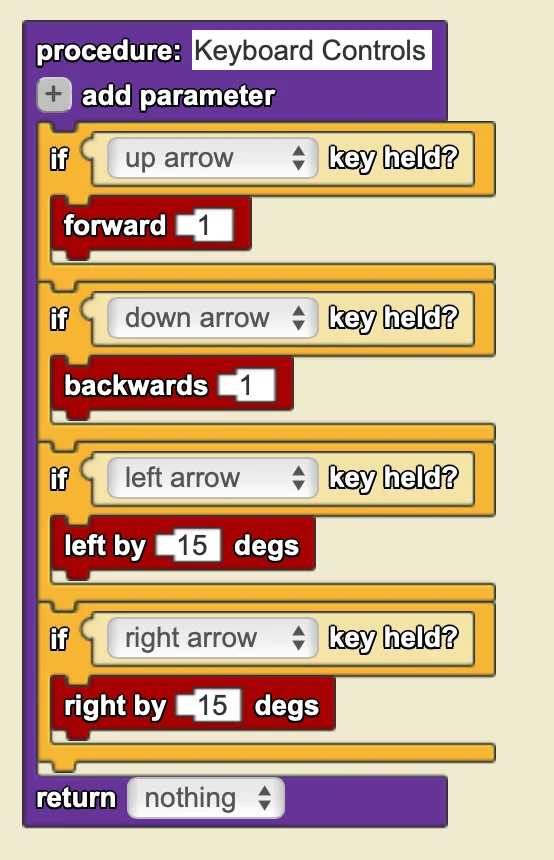
Use the skills and knowledge you learned in step 2 to program the rest of the keyboard controls. Program that if the down arrow is held then the agent moves backward 1 step (hint: use "backwards _" block), if the left arrow is held then turn left by 15 degrees (hint: use "left by _degs" block), and if the right arrow is held then turn right by 15 degrees (hint: use "right by _degs" block).
Check Your Progress!
Your procedure code should look like what's shown below. It doesn't actually do anything yet, but that's coming in the next step.
Part 9: Call the Procedure
Last section, you programmed the procedure to connect the agent's movements to the keyboard, but there is no code to call this procedure. In this section, you will connect that procedure code to a toggle button.
Call the Procedure
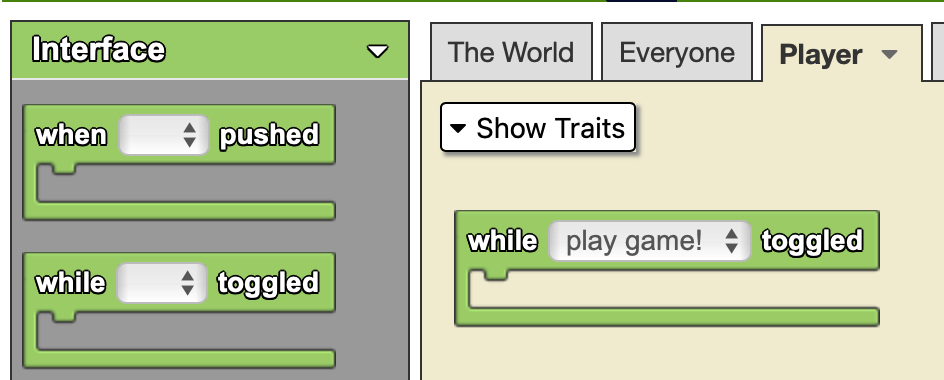
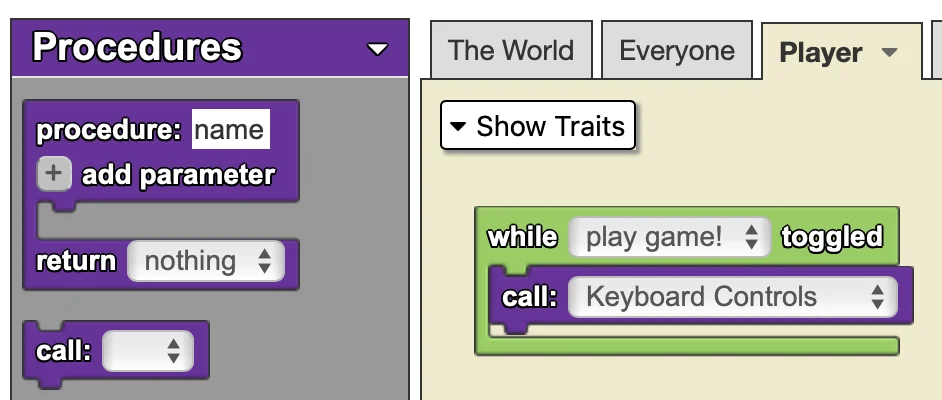
- Make sure you're still on "The Player" tab
- Open the Interface drawer
- Drag the "while _ toggled" block onto the Player page
- Select "play game!" from the dropdown menu
- To connect the "Keyboard Controls" procedure to the "play game!" button:
- Open the Procedures drawer
- Drag the "call _" block into the "while _ toggled" block
- Select "Keyboard Controls" from the dropdown menu
The "while___ toggled" block tells the Player what to do while the specified toggle button is toggled on.
Check Your Progress!
Click "Run Code", "setup", and "play game!". You should be able to control the Player agent's movements with your keyboard.
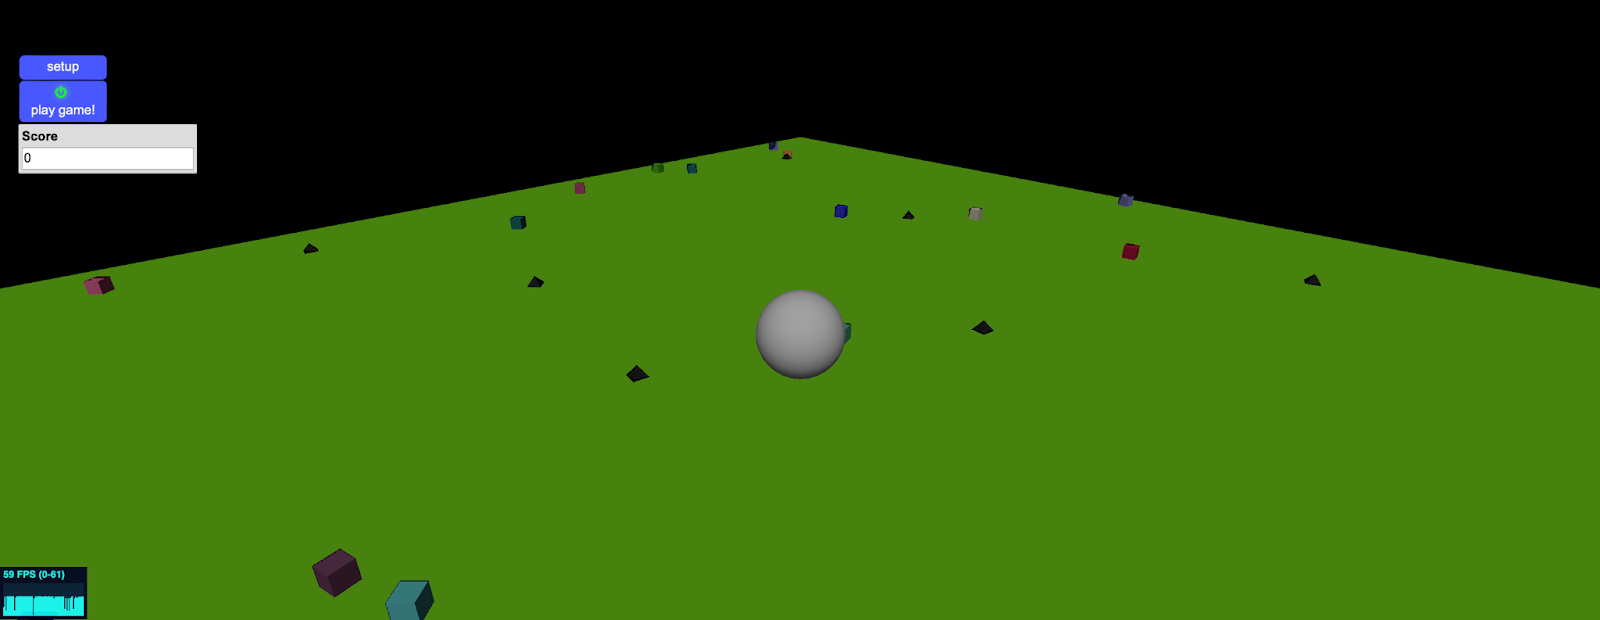
*If you are unable to move, try clicking on SpaceLand then repeating the steps above
Part 10: Collect the Treasure
In this section you will write code so that when the Player and a Treasure collide, the Player "collects" the Treasure.
1. Program the Collision
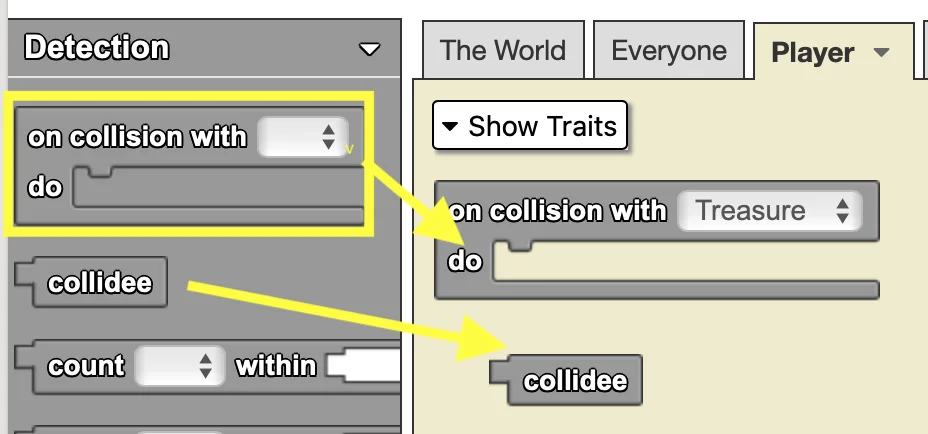
- Navigate to the Player page.
- Open the Detection drawer.
- To program what will occur when the Player collides with a Treasure:
- Drag the "on collision with ___" block onto the Player page
- Select "Treasure" from the drop-down menu on the "on collision with ___" block.
- Pull out the "collidee" block; you'll need it in the next step.
The "on collision with ___" block tells the agent whose page it is what to do when they bump into an agent of the selected breed.
2. Program the "Collecting" of the Treasure
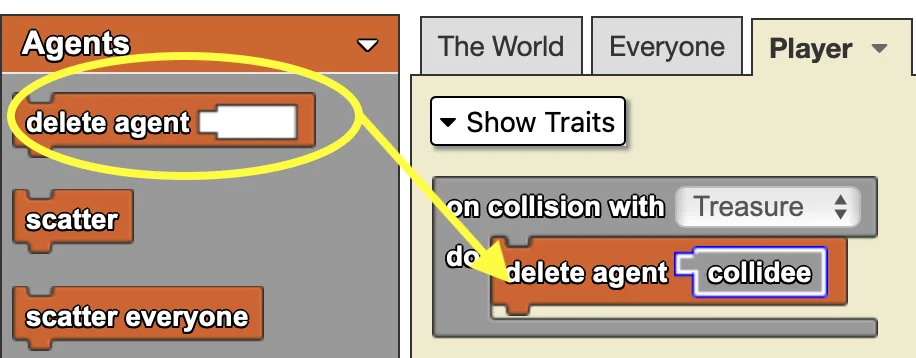
- Navigate to the Agents drawer.
- To delete the Treasure that collides with the Player:
- Drag the "delete agent" block into the "on collision with ___" block
- Connect the "collidee" block into the "delete agent" block.
The "collidee" block represents the other agent in a collision. So the code above tells the Player that whenever it collides with a Treasure, the Player should delete that Treasure.
Check Your Progress!
Click "Run Code", "setup", and "play game!", you should see Treasure being "collected" by the Player as they collide.
Part 11: Have Player be Blocked by Obstacles
In this section you will write code so that when the Player and an Obstacle collide, the Player is "blocked" by the Obstacle.
1. Program the Collision
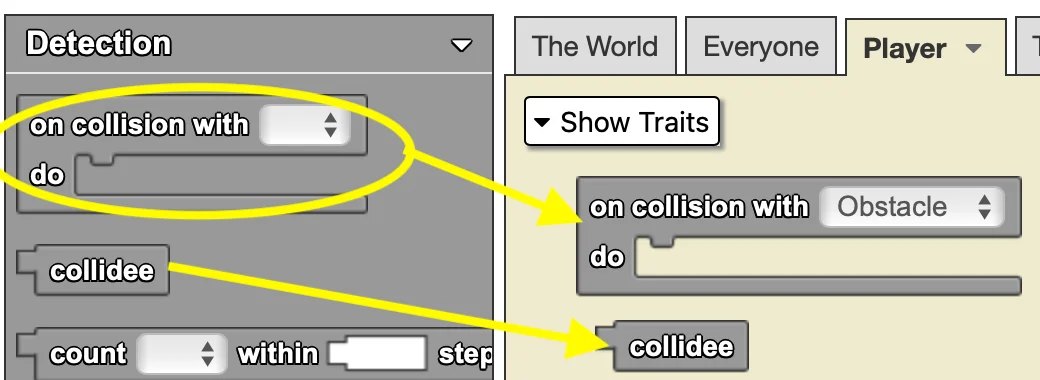
- Navigate to the Player page.
- Open the Detection drawer.
- To program what will occur when the Player collides with an Obstacle:
- Drag the "on collision with ___" block onto the Player page
- Select "Obstacle" from the drop-down menu on the "on collision with ___" block.
- Pull out the "collidee" block; you'll need it in the next step.
2. Have the Player Bounce Back
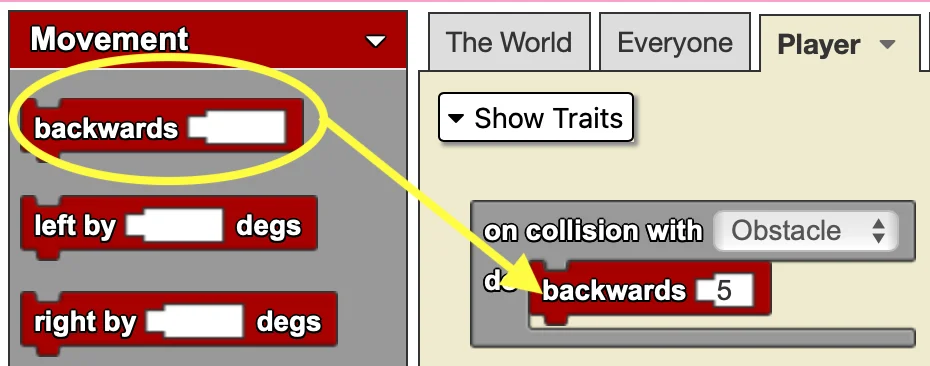
- Navigate to the Movement drawer.
- To have Player be bounced back by the Obstacle:
- Drag the "backwards _" block into the collision block
- Type 5 in the empty socket
Check Your Progress!
Click "Run Code", "setup", and "play game!", you should see the player be pushed back when they hit an Obstacle.
Part 12: Keeping Score
In this section, you will program the data box to update each time you collect a treasure or an obstacle.
1. Keep Score (Treasure)
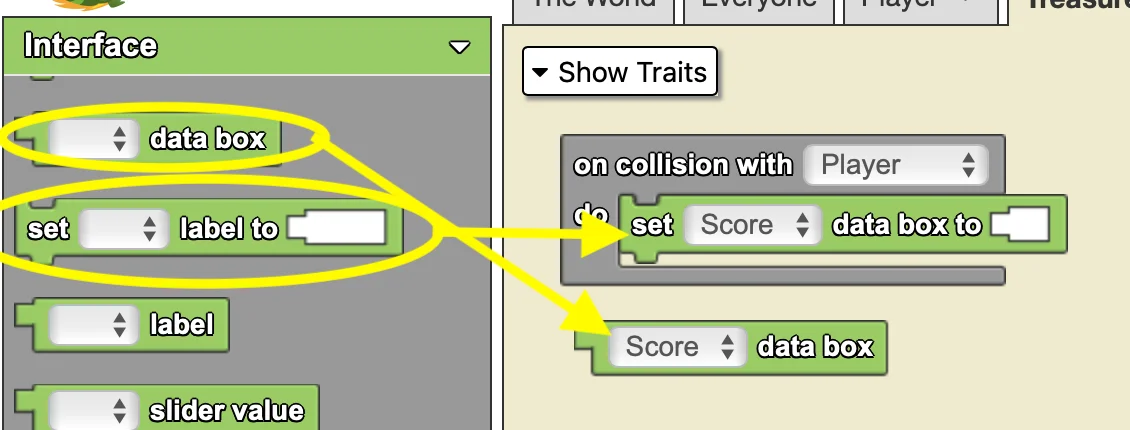
- Navigate to the Treasure page.
- Open the Detection drawer
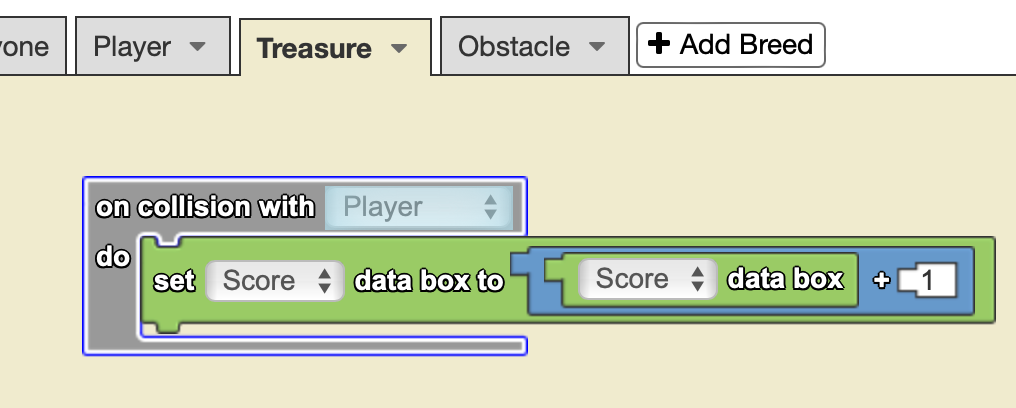
- To have the "Score" data box be updated each time the player collects a Treasure:
- Drag "on collision with _" block onto the page
- Select "Player" from the dropdown menu
- Open Interface drawer
- Drag "set _ data box to _" into the "on collision with ___" block
- Select "Score" from the drop down -- this refers to the "Score" data box in SpaceLand
- Drag the "_ data box" onto the page and select "Score"; you'll need it in the next step.
Data box is a type of widget which can be used to either display information or take input from the user.
2. Add to the Score
- Open the Math drawer
- Drag "_ + _" onto the page
- In the left socket place the "_ data box" block
- In the right socket type "1"
- To have the score increase by one every time a Treasure collides with the Player:
- Drag the "_ + _" block into the empty socket of the "set _ data box to _" block
3. Subtract from the Score
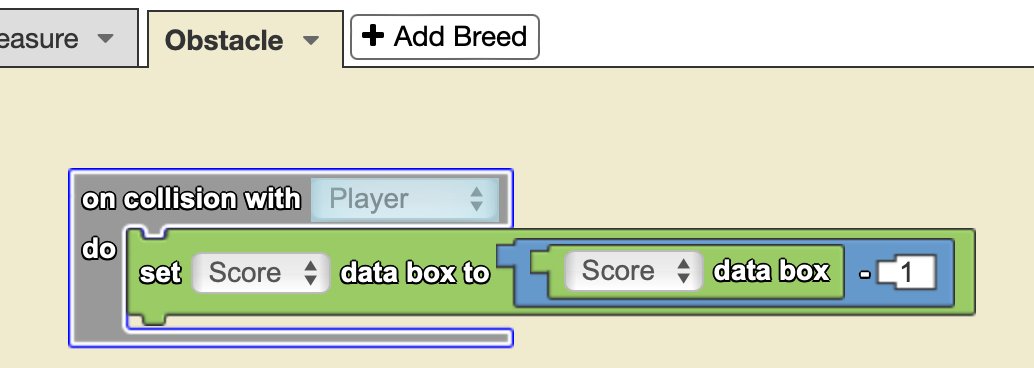
- Navigate to the Obstacles page
- Repeat steps 1 and 2 above (for adding to the score), except this time, use the "_ - _" (subtraction) block instead of the addition block.
Check Your Progress!
Click "Run Code", "setup", and "play game!". Every time the Player collides with either a Treasure or Obstacle, you should see the score increase or decrease by one.
Copyright 2024 MIT Scheller Teacher Education Program. Distributed under Creative Commons license CC BY-NC 4.0.